
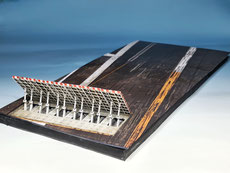
Carrier deck in 72nd and 48th.


WHAT IS THIS?
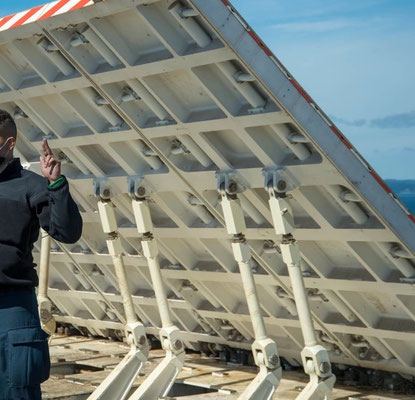
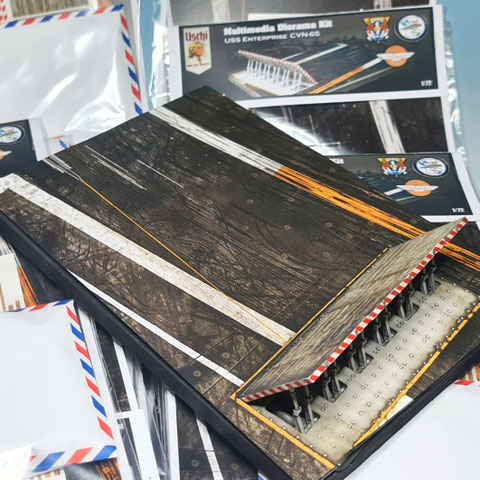
This is a scale model kit set of a flight deck including the Jet Blast Deflectors (JBDs), being very similar to a C-13 ctapult onboard USS Enterprise CVN-65. It is not an entirely accurate representation of a C-13 but it includes all the prominent features, reflecting the typical look of a carrier deck JBD on carriers of her era.
The kit consits of
- 3d printed parts
- High quality color printing
- Decal sheet
This product is available in the 72nd and 48th scale.
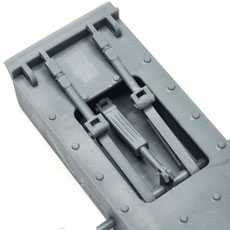
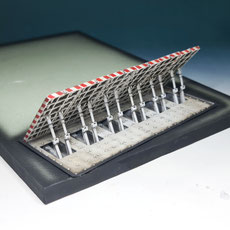
Above. We have 6 "tubs" in total (meaning hydraulics bays) with two being positioned on the edges (L- and R-Tub). The C-tubs are included 4x. We assemble these tubs to a "cassette" which we combine with the base plate (not included) but more to this down below.
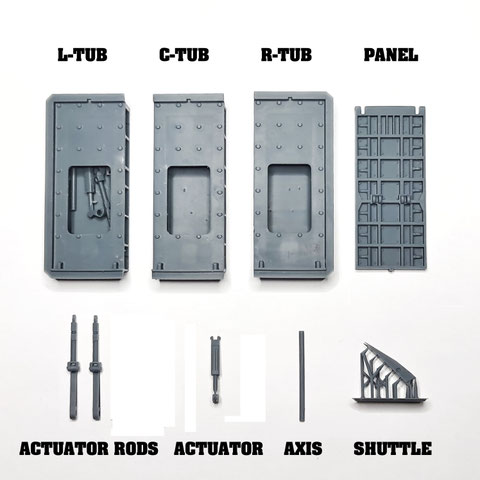
LIST OF CONTENT
- L-TUB 1x
- C-TUB 4x
- R-TUB 1x
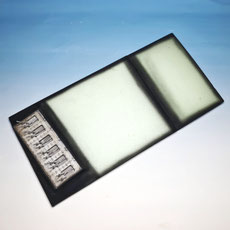
- PANEL 6x
- ACTUATOR RODS 12x
- ACTUATOR 6x
- AXIS 6x
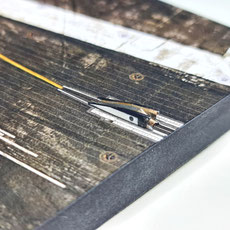
- SHUTTLE 1x
- DECAL SHEET
- HQ ART PRINT
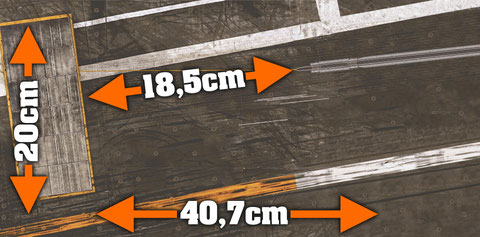
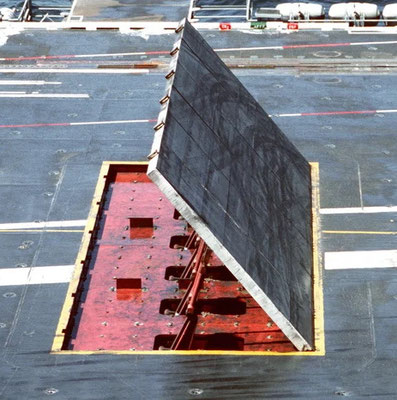
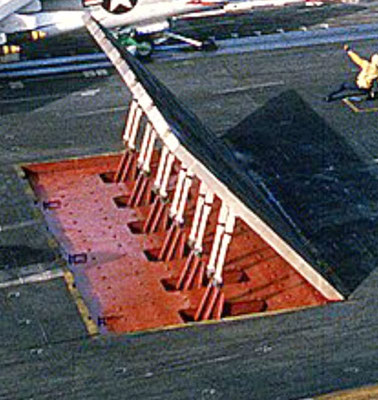
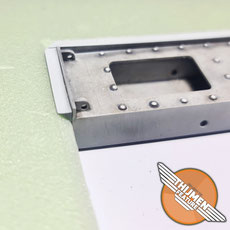
Above: Birds eye view (1/72) the on the print included in the kit. It´s very close to CVN-65´s No.3 waist catapult. The nose gear of a model of a fighter aircraft would be sitting forward of the shuttle block. The rear of the model would be kind of close to the JBD.
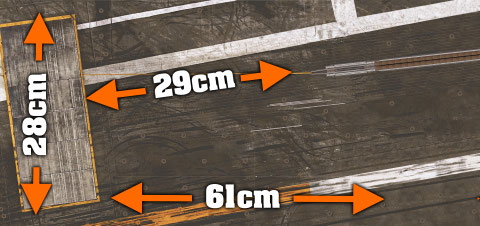
Above: Birds eye view 48th scale.

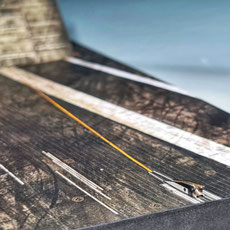
Above: Approximate position of an aircraft relative to the JBD. The AC shown on the image is not "strapped" to the catapult yet. Strapped condition would be a tad more to the right. The shuttle is included in the kit.

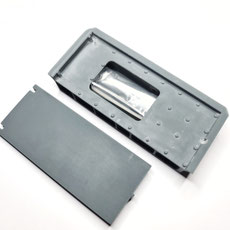
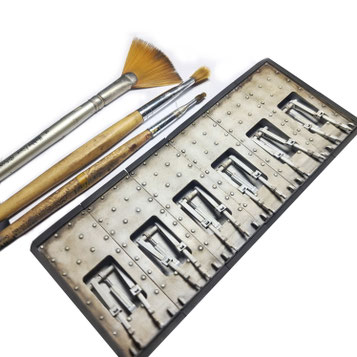
The small parts would be found inside of the tubs which are covered by a panel. Like a pill box. The shuttle is being packed separately and it has its supports still being attached to it. Why exactly will be mentioned further down in this article.
QUICK BATTLE PLAN AND SOME REMARKS
Let´s start with building and painting the JBDs.
We´d paint the actuators, actuator rods as well as the axis prior to assembly.
It´s better because we have a separate axis for each tub, so we need to pre-assemble the internal parts.
We paint the interior of the tubs.
It´s better because we have a separate axis for each tub, so we need to pre-assemble the internal parts.
We combine all pre-painted actuators, rods and axes with the tubs.
No glue needed. The actuator can simply be pressed against the spot being visible on the left image below. It sits but it´s still movable.
It´s a dry-fitted- sub- assembly now.
We combine all completed tubs to a "cassette"....
...so we can fit it into the base as one piece. Consider placing all tubs on cardboard
or something stable for reliable handling.
We combine the cassette with a base (not included)
I would use styrofoam aor anything that can be manipulated easily.
We combine the color printed sheet with the base and the cassette
The blast panels can be painted and assembled at any point of the project
The shuttle can be pained at any point of the project
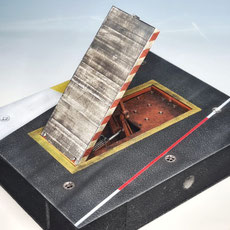
PLEASE NOTE that this design does not support blast panels being positioned flush with the deck. That´s not why you´re here anyway, right? :))
PLEASE NOTE THAT SOME PARTS ON THE IMAGES BEING USED IN THIS SBS MIGHT STEM FROM THE PRODUCT DEVELOPMENT STAGES AND SOME PARTS MIGHT LOOK A LITTLE BIT DIFFERENT.
Alrighty, let´s go!
As you might have noticed you dont have to mess with too much of any supports in this product. We have removed all these for you already. Please check for small little remains which would require some sanding perhaps.

Correct positioning of the hydraulics assembly. (final version) The axis can be inserted and clipped off on the outside.
The cassette, ready for being installed. 72nd scale


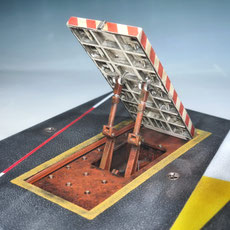
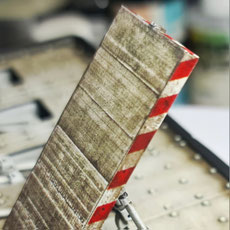
Above: 48th scale in an application without prints. This is a test build of a single JBD panel which is not a thing in the real world. In RL these usually come in sets of four and six. The tie down points added in this scene would be part of a release without prints, but with the catapult rail and tie downs instead. That´s for the people who would like to paint their deck themselves. The deck texture shown in the image has been applied with AMMO Anti Slip Paste and a roller.


Besides typically being painted all White, there is also all kinds of combinations with Red out there. CVN65´s JBDs were all White. It´s unclear to which unit the images above would belong to. The weathering is ranging from pristine to buckwild. Also not the that some JBD and no Red/White warning pattern at all.

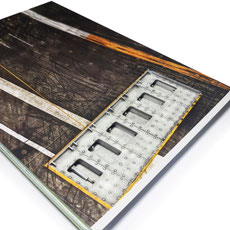
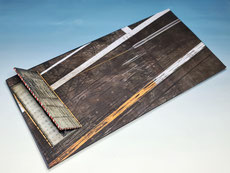
Above. Once we have the cassette ready for being installed, we take our print as reference to determine the exact position of the JBD cutout on both, the print and our base plate
There is several ways to approach this but here is what I figured out to be practical for me using styrofoam. So, the JBDs panels have been cut out of the print and the contours have been transferred (traced on our base) so we can make a cutout here as well in order to lower the cassette down flush with the deck.
- Cut the JBD panels out of the print.
- Sacrifice parts of the yellow band to the left, right or forward. You can replace these areas with yellow band from the decal sheet.*
- Make sure the hydraulics cassette fits the cut out on both the cardboard and the base plate.
Note that we are pretty close to the edge in the upper right corner. Include that into your considerations and planning in regards to the design of your base plate. That´s the positioning part and the reason for yellow band decals being included.
The yellow band decals allow for adjustments in positioning and corrections. So, where ever you might have lost some of that yellow line, you can recreate
said line with our decal. Again, mind the water. Please seal first with flat clear varnish before applying decals. Let´s have a closer look on this process.
In order to apply the yellow band decals, you would
- Seal (ideally the entire print) with flat clear
- Mask around the area you want to apply the yellow band on and apply a white(ish) base coat.
- Remove the masks
- Apply the yellow band decals. Consuder using a light amount of setter. (perhaps combine with some yellow paint)
- Seal with flat
YOU CAN ALSO DO THIS ONCE YOUR PRINT IS BEING GLUED TO THE BASE.
* AGAIN CAUTION: In case you go that yellow band route, seal the entire print with clear flat
varnish, or at least in the area you are going to apply the decal on. Reason: Drops of water or setter may cause unwanted irritations on bare paper. It´s very easy to apply decals on a SEALED
print. It´s kind of annoying to repair irritations caused by water drops.
But: We are little bit ahead of ourselves right now. Let´s go ahead and have a look on the levelling of this entire
project
As you can see below, we have added an "overhang" to the tubs. This overhang allows to position our tubs flush with the deck.


Above: These images are from the product development process. They are being used to illustrate the purpose of the overhang. The lower row would show a properly placed "cassette".
As you can see, all edges are being painted in Black. It´s something one could do in order to be less irritated by bright spots flashing through here and there.
VERY USEFUL FOR WORKING WITH THE PRINTS: After cutting, paint the edges of cardboard sections using a marker matching the color of the deck.
Like a very dark Grey or Grey Brown would be good.
EXCEPT where White is being involved on the print. Just leave them edges as they are in these areas. It helps to hide the separation
lines.
On the side being closest to the edge, we now would have to decide if ...and what ...and how much we would want to cut off or sand flush of the overhang. The design of the exact solution would
depend on the materials being used for the base itself your positioning and potentially a frame.
And now....we can go ahead and get our prints on.
First: Some dry positioning. When everything is cool we can glue.
I´d recommend using White PVA wood glue for fixing the print onto the base. Apply the glue to the base evenly, like a coat. Let it set for a few minutes. Fix the print to the base and apply
pressure. Let it dry until the glue has hardened and set.
ONLY GLUE THE PRINT TO THE BASE WHEN YOU´RE 100% SURE that everything fits well.


Above: Here we have our cool decal sheet, providing the same realism as the cardboard prints. Actually they are being taken exactly from there.
Just paint the entire panel in white (you wanna go there anyway) and apply the decal. Use some setter. Seal with flat varnish, consider a light bownish filter.
NOTE: The Red-White decal strips are only being used on the outside of the panel-array. These decals are not required inbetween the panels.
IMPORTANT for users of the 48th scale version: Separate the large texture decal in at least two sections, if not in three. It handles way better and helps to avoid the risk of tearing.

Alrighty. Let´s move on to the shuttle now, shall we?
The shuttle ist he only part that comes still sittin at it´s supports.
We left it on there for more convinient painting.
We would
- Paint the whole thing Gloss Black
- Mask off the sides and use some bare metal paint for the upper side
- Partially mask off the sides and apply White
- Make a dot as can be seen on the images.
We have left a little recessed spot in there, almost like an ejector pin mark for more convinient painting.

Above: Metallic paint has been applied, sides are being masked off to apply white.
Below: That´s out guy! As you can see the Black dots vary in size. That´s when I went ahead and added the injector pin mark.

Above: These images are from the product development stages. Your product is longer than what is shown, just as on the overview image above.
Above: These images are from the product development stages. Your product is longer than what is shown, just as on the overview image above.
Yeah.... and with this we would be good. It´s a very nice product if I may say so myself. It´s pretty easy to assemble and super-effective.
Some of you may know that the actual print is been around for a while. It always has been my dream to combine these prints with 3d objects. This one here is this vision being brought to reality.
It´s a multimedia diorama kit. I hope you have as much fun building it as I had putting it together for you.
All the best from my place to yours.
Alex