
Polishing Powders for Dirty Engines or High Gloss Chrome Finishes
Small Preface:
It´s not AK Dark Steel, it´s not CMK Stardust, it´s not MIGproduction Phantasy Pigments, nor it´s something alike neither. This is a whole lotta different story.
So, what is it?
Uschi van der Rosten´s Metallic powders is a range of complementary metallizers, including the ability to replace existing metallizers on many occasions. It always depends on the situation. Machinery and Aircraft Exteriours are two entirely "different cups of tea" as they say. I would not rely on our powders only, having a full grown NMF project on my bench.
Natural Metal Finish (NMF) is one of the most challenging jobs in scale model building. The goal is to turn plastic into metal and make it look like real metal rather than a paint job. During the research for the release of our products, I followed exactly that goal: Make it look like real metal. I also had to keep Uschi´s key requirement in focus: Making things easy. Both has been accomplished and we now have another powerful tool to make convincing NMF easy as child stuff.
The key is in the mix. When we combine various effects, we achieve the complexity that forms a masterpiece. I would like to encourage you to combine our pigments with methods you are used to.
I would keep it with Gerald “Hawkeye” Voigt and one of his statements: "Modeling is a series of techniques, learn to master the techniques and you master the model." Uschi would like to add: "Load your toolbox of techniques with as many of tools as you can get. Pick the tool you like the most when facing a challenge. The more tools you have (techniques mastered) the easier it is to master the challenge."
Nuff philosophics now. Lets talk about solid metal.
Right to exist
I keep it short: The results are outstanding, handling is easy and the price-performance ratio is second to none. Thats it.
If we look on the details, we see that we have many triggers to play with, such as the basecoat´s gloss level, the color of the basecoat and the way to apply the product. (Polishing or by Airbrush)
Polishing pigments do change the look of "painted metal" a lot to the better on both, even surface or complex shapes. The product provides more variation and complexity in Finish.
In the following you will also see how we shoot the pigments through an airbrush. I used simple thinner with no color medium in it. Thats another interesting way to use the product.
All these additional options on rendering NMF are representing the product´s right to exist through the benefits it offers.
Opportunities in application
Cotton bud / Cotton cloth
The application in a polishing manner is what the product is basically designed for. As a basecoat I recommend flat, semi-gloss or gloss black colors, depending on the subject you work at. Allow the material to link into something. If you have a superpolished black basecoat you may find out that the pigments not really adhere when you try to polish them in. The solution in this case would be a semi-flat basecoat. The shine will come when you polish the powders in. Consider application by airbrush as well.
Another interesting point in even surfaces is, that the best time for pigment application is when the color is touch-dry and stable, but not fully cured.
For Gunze Acrylics (Or Tamiya) this is within like 1,5 - 6+hours.
Application by airbrush
The application by airbrush has the advantage of creating a chemical bonding to the surface. Use the same thinner that you used to thin the basecoat color. Consider colors like blue, red, yellow and even white as a color for the basecoat too. Use your trusty workhorse Airbrush for the job to avoid clogging your fine art airbrush. I wouldnt recommend to use a 0,15mm Nozzle set. It works, but maybe you will have to move the needle a bit back and forward sometimes to get it going again. Use a bigger one instead.
Flat panels and complex shaped objects
Complex:
When the object is rather complex, like an engine for example, I would recommend to use a black (or very, very dark grey) flat basecoat. This way we make sure that we have a nice depth because we have dark corners. I would recommend to shoot the pigments through an airbrush first, polish it up and apply further glossy spots using a cotton bud after, creating polished highlight thats way.
Flat panels:
Here we have the best opportunity to apply variation by altering the basecoat colors. As said above, consider colors like blue, red, yellow and even white in order to achieve variation. Please always do run a tesbed before you work on the real model. Make yourself familiar with product.
Its good to know that.....
- ....high gloss polishing on a even is recomended to be done within 2-4 hrs after basecoat application. Acrylics need some time before they really cure. Consider a thin layer of pigments applicated by airbrush in case the basecoat has fully cured and the pigments seem to "not adhere so well"
- ....a sealing with clear might change the result. Not ruin it, but alter the result.
- .... the application rule of : 1.) basecoat; 2.) pigment; 3.) clear; 4.) again pigment ; might be an option as well.
- .... it is worth experimenting with our powders to achieve the subtle gold flecked appearance as can be seen on modern metal-dampened
aircraft canopies such as on a EA-6B Prowler, for instance.
Lets check out a video
Polishing Powder Time. Check out this short and very informative video made by Matthew John of Albion Alloys Precision Metals. Matthew is showing us how to achieve great results instantly. He also shows the masking properties of the product, combined with useful hints in application to achieve color variation. Citizens of the UK may ask their trusted dealers for availablity first.
Durability
An article by Ian Henry
I found the pigment powder difficult to seal and handle as oils in fingerprints and stuff grazing the surface can mar and remove the coating over time. Every sealer I tried dulled the beautiful surface finish of the raw, buffed powder, until I found a great combo. Certainly not saying this is the best method, just what worked for me.
For both projects here I used essentially the same process, just with slightly different brands of materials.
Step 1: base coat black. I used a crappy hardware store rattle can black I had left over.
Step 2: 2k clear high gloss top coat. I used Spraymax 2k High Gloss from a can, 3-4 wet coats.
(It’s awesome stuff in a pinch but pretty pricey. 24hr pot life, no mess or mixing. Just pop the cap on the bottom, shake and spray!)
Step 3: Apply chroming powder. I used a cotton ball and dabbed it into the powder, then straight to the fully cured Clear (12-14hrs later) and buff it into the surface and be amazed!
Step 4: seal the chrome with a Liquitex High Gloss Varnish. I sprayed mine from an airbrush, but it can also be brushed on if necessary. Let dry according to instructions.
(Optional) Step 5: once it’s sealed you can then go over it again with another coating of chrome powder to brighten the dark chrome up a bit. I prefer double coated chrome to single. Just a bit brighter and deeper finish. Seal again with another coat of Liquitex.
Step 6: top coat with a few more 2k Clear coats for desired finish.
The end result is a super durable 2k chrome finish that’s rich, vibrant, and gorgeous. No one believes me that it’s paint and I feel like that’s the best indication you can
get that it looks good. This is an amazing product that with the right materials is stupid simple to make an amazing finish. The small jar of powder has lasted me through tons of testing, a
couple accidental spills, and several coats on finished projects and I still have over half the bottle left. One jar is all you need for dozens of models.
Thanks for your time and I hope this helps some people!
Ian Henry


A flash-gallery by Kamil Feliks Sztarbała
Kamil is an extremely talented modeller from Poland and a good friend. In this gallery he shows how to combine the product with multiple layer application of various techniques.


Small bits, large pieces....there is use for polishing powders almost everywhere. See how fast Dr. Cranky creates depth and contrast on a tiny skull for his current project. Thanks Virgil! Nice to see you having fun with it. :D
Step by step sequence for a dirty Engine

Gunze H-12 has been applied all over the engine. (You can buy it in the color section.)

Variant 1.) Application by airbrush: Load your airbrush with some thinner (consider tinting) and put some pigment in it as well. How much? As many as allows you a nice shooting. I would avoid a cream-like consistency and keep it liquid.

The engine block after pigment application by airbrush.

Starting the polishing using a polishing cloth. First effects are visible.

Polished all the way down. Shine is coming up quite well.

Now we enhance the shine on the larger surfaces ("panels" as I call them.). We also can go along the exposed ribs and such in order to place some nice shiny highlights.

Cylinder section has been masked off and again some Gunze H-12 flat black has been applied.

Polishing finished. Do you see the depth we already have? Its like a preshading effect but actually caused by the areas we couldnt reach that well with our polishing cloth and bud.

On areas without much detail we were able to create a high shine.
On the finishing line
Well that was it. Its as simple as that. For further effects I would like to suggest to add some earth/dust-alike pigments, giving our engine a quite dustly look, caused by the dust that some oil or grease may have catched.
Voila! :-)


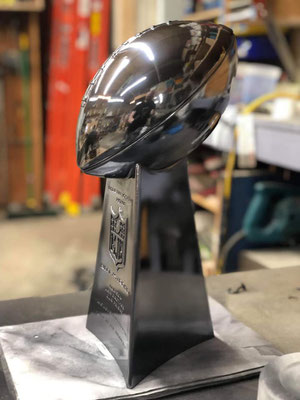
High Shine Chrome Effects
In the following we just use a piece of cotton cloth and polish the powder directly on a gloss-Black base-coated surface.
I recommend to do this within like 6 hours after basecoat application. On a piece which had a fully cured gloss basecoat, applied month ago, handled and touched very often, I noticed that the powders do not adhere like they do on rather fresh-painted surface. I think this has to do with finger grease and that sort of things. So, you better dont wait longer than like 3 days or something like that. I will update this text here as soon as I have solid figures.

So, as said above, this one here was very simple. I did a high shine Black bascoat with Gunze Levelling Thinner (available in the Thinners category), and allowed it to dry let it dry for like 8 hours (last thing before hitting the sack, first thing after hitting the bench) and just polished the the powder right on it. Done.
Sorry for the dust. I fired up my hair dryer for the first time since 2 month and some dust came off the damn thing. :-)))) Right on the wet gloss coat, of course. Doh!

Hard to capture on artificial light: Steel on the left and Chrome on the right.
Can I mask on top of a polished, powder treated coat?
Yes you can do that. The piece pictured below is the same that you see on
the other pictures (with the huge dust piece on it) which was high shine chrome polished. For the masking prove-test, it was treated like that:
- 1.) Gloss Black basecoat;
- 2.) Polishing Powder Chrome
So, thats were we were on the pictures above.
Now I went on:
- 3.) Masked off an area and painted it gloss Red;
- 4.) Let it dry and removed the masks
-
5.) I masked off a rectangular area on
top of the Red
- 6.) Polished this area, automatically using Red as a base coat
-
7.) Removing the masks

Last but no least: Safety

Our product is non-toxic and does not require special declarations. Flamable, explosive or toxic metallic powders are not contained. There are no shipping restrictions.
Security data files are available upon request of authorties. H-sets and P-sets are available as well upon request by authorities only.
The product has been produced according to the regulations provided by the European Chemicals Bureau (ECB), Appendix 1, Directive 67/548/EWG, as well as in line with the
requirements of the Globally Harmonized System of Classification, Labelling and Packaging of Chemicals, (GHS), United Nations, 20th of January 2009.
Nevertheless, and for the sake of common sense and completeness we recommend to keep the product out of reach of children, wear gloves and a mask while handling and using.
This product can be found in the Colors and Pigments Shop Section:
