
All you need to mess up your windows
Shut up and take me directly to the point of sales!
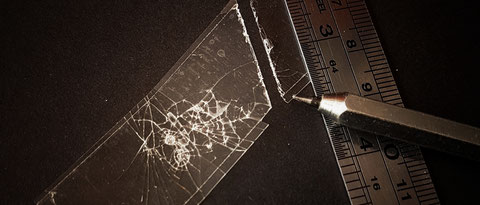
This kit contains a carefully assembled collection of tools and materials, allowing you to create shot and shattered glass in an absolutely controllable fashion. The central tool here is the glass cutter, who also serves as a tool for puncturing the glass in order to create the effect of bullet holes. Lets have a look on the content in detail.
The glass
We have 10 sheets in here, coming at 22x60mm
The tape
The tape is serving as a carrier film, in order to stabilize the glass after it has been punctured or otherwise broken. It works exactly like safety glass in this instance.
The tape included is the best around I could find. Clear tape doesnt equal clear type. We want to have the option of having an absolutely flawless piece, with no unwelcomed additional texture on it. However, most of the tapes generate a certain pattern while removing it from the drum. It´s all about the glue. It´s ranging from stripes to chaotic patterns and even kinda bubbles being visible. Lets have a look on an image.

The upper tape is the high quality tape provided with the kit. The lower one is a random tape. You can´t tell if it´s good or not until you have actually tried it.
The cutter
Comes in the shape of a pen. Use it like a scriber. Start with low pressure , moving back and forward, applying more pressure until the pen is actually "cutting" the glass. Once the glass is cut through, but being kept together by the carrier tape, please bent it to the side and cut the tape with a blade. Lets watch.

The steel ruler
Some people dont have one, some people have longer versions which are not very handy. Just to make sure the kit is working fine for everyone, I have included a short steel ruler of 6 inches in length (15cm). It´s the perfect guide for the cutter.
The sand
Spill some sand on your desk and press the taped glass against it. The larger parts in the sand can be arranged, so you have an influence on the result. Lets have a look on an image.

So, basically we have two ways of creating our glass. One is going for the bullet hole and the other method is for randomly shattered glass and shattered glass with one or multiple larger holes in it. Lets have a look on some results.

Bullet holes to the left and larger holes to the right. The larger holes have been crated by removing splinters and tape on the exact spot the hole is being located. You now may be using some dust pigments for further effects. One could apply some effects airbrush with Greay or maybe Light Brown paint. Oils might be handy as well.

The bullet hole effect being applied to a car.
We hope you will have a positive experience with our product.
Thank you so much for your attention.